
Written by: Sean Struckmeyer | Tech Inspect Home Services LLC
I. Introduction
Crawlspaces are usually uncomfortable, scary places that most homeowners never venture into. That’s why as a home inspector it’s my job to go into these places. While most homeowners treat this area with an “out of sight, out of mind” mentality and don’t monitor it (I don’t blame them), we have a good example of why checking in on it periodically can prevent larger issues later.
This case study represents the second scenario where I encountered a disconnected HVAC Duct in a crawlspace and the same issues in less than 30 days and all in the St. Louis area.
Why does crawl space health matter? A neglected crawl space can allow issues to compound, where moisture, and other issues can become a breeding ground for mold, which can then enter the living space of the home.
- The Issues: In my experience, larger issues are usually made up several smaller problems that work together and compound the problems. In this case, we have 4 issues to examine.
- Leaky HVAC Ductwork
- Failed Vapor Barriers
- Poor Ventilation
- Exterior Water Intrusion
TL;DR – Crawlspace Mold: How Small Problems Become Big Ones
Why do crawlspaces develop mold? Mold rarely has a single cause; it results from multiple smaller issues compounding over time. Mold needs only three things to thrive: moisture, time, and an organic food source like wood joists. A neglected crawlspace provides all three.
What happens if it goes untreated? Mold damages structural floor joists and, when combined with leaking ductwork, can spread spores throughout the entire home via the HVAC system.
What should homeowners do? Inspect your crawlspace periodically, or have a professional do it. Catching any one of these issues early costs far less than full mold remediation after all four have had time to compound.
II. Issue #1: HVAC Ductwork Not Sealed
- How it Should Be: Running ductwork through a crawlspace to supply the home with central air is not an incorrect installation. However, it must be done properly and maintained to prevent issues from occurring.
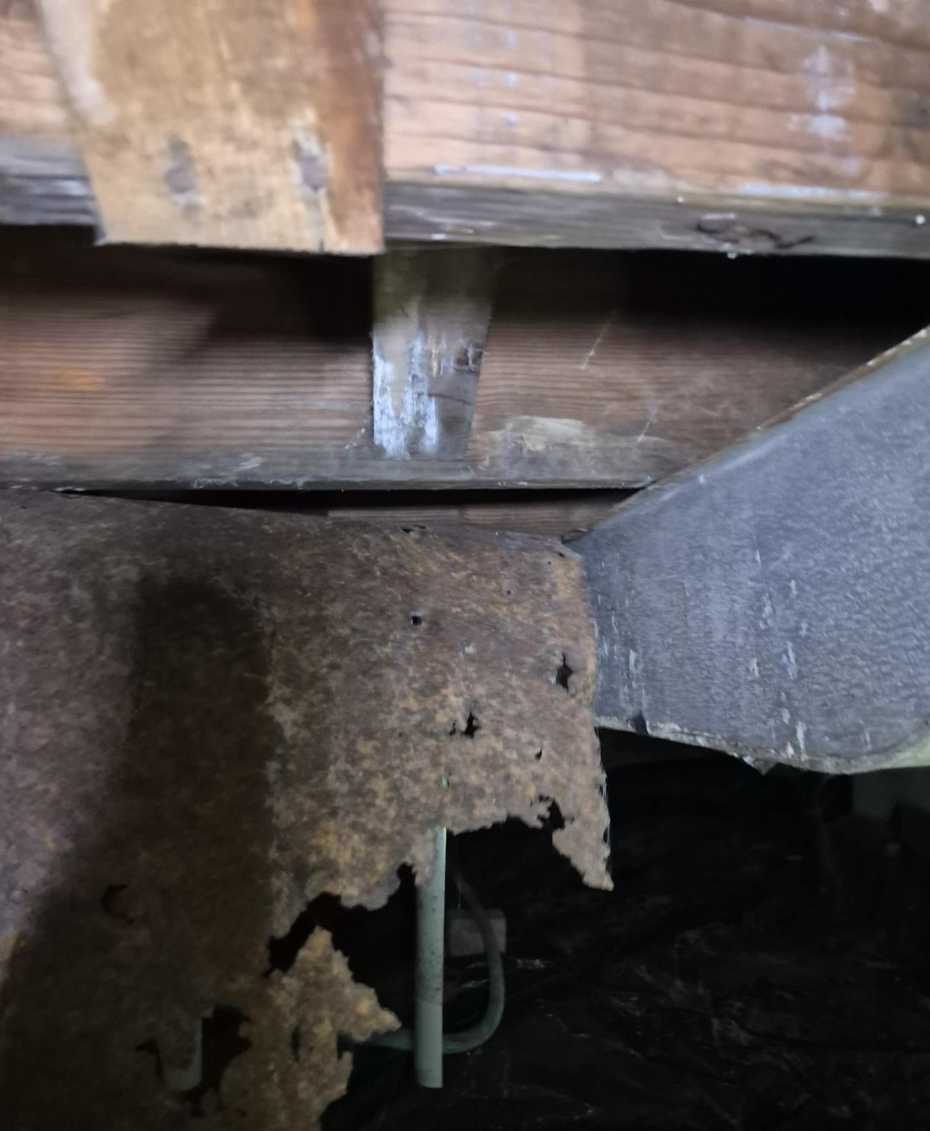
- The Problem: Through age, vibrations, or other damage, ductwork in crawl spaces often develops gaps, loose connections, or deteriorating tape over time. Or in this case, large sections of the metal used to cover and seal the ductwork rusted through and deteriorated over time allowing open and easy access to the ductwork return. During the inspection, I could stick my hand inside the ductwork, and feel the air.
- Picture of the Rusted Ductwork Cover:
- The Science (The “Why”):
- Energy Loss: You are paying to condition the crawl space, not your living room.
- Negative Pressure: When return ducts leak, they suck up damp, moldy crawl space air and distribute it throughout the house.
- Condensation: Since crawlspaces are generally unconditioned spaces, they rely on ventilation to remove the natural humidity and moisture levels located in these areas. When a ductwork has a leak and is able to expel hot air in the winter, or cool conditioned air in the summer into the crawlspace, it can disrupt the natural balance of ventilation and cause condensation to form.
- Here’s a diagram showing a leaking HVAC Duct in a Crawlspace from InterNACHI:
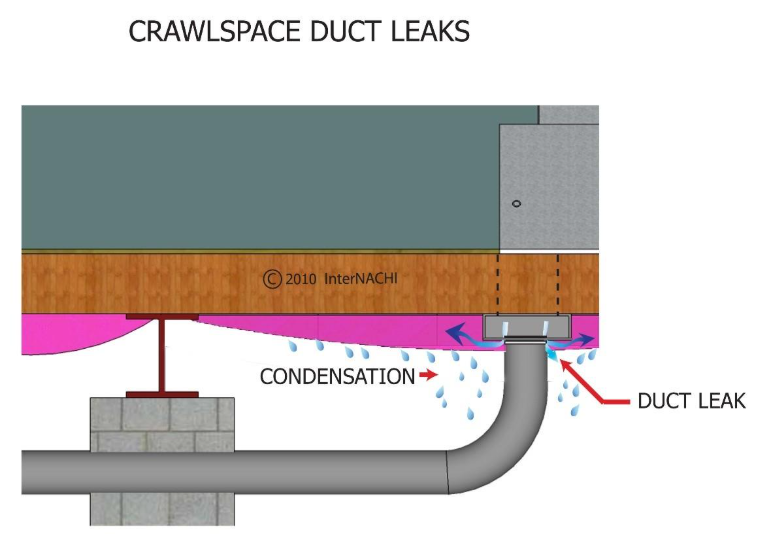
- The Consequence: This can lead to higher heating and cooling bills, but also can introduce more moisture into an area of the home that it cannot handle. Also, any HVAC duct leaks not only create a scenario where air can enter the space, but dirty air can also enter the ductwork or be sucked up into the duct.
- Inspector’s Insight: Something to note, is that metal does not rust through overnight, that takes a significant amount of time but also alludes to other issues such as a moisture problem, since the elements required for rust are time, moisture and air. During a home inspection, inspectors also look for disconnected joints, damaged sealing tape, and rusted ductwork.
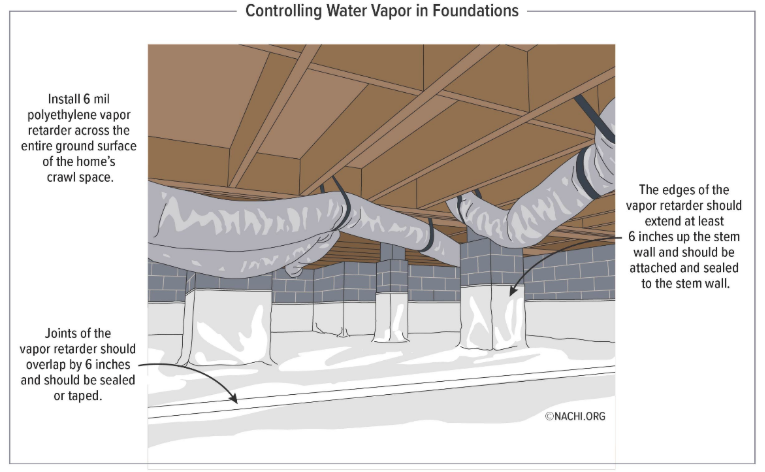
III. Issue #2: Improperly Installed Vapor Barrier
A crawlspace vapor barrier is a heavy-duty plastic or polyethylene sheet (typically 6-20 mil) laid over the soil to block ground moisture from entering the home. It is designed to prevent mold, structural wood rot, and humidity issues by sealing the ground, protecting the foundation and improving indoor air quality.
- The Problem: In this example, there was a 6-mil vapor barrier installed at home. However, it was not installed correctly. The vapor barrier seams were not properly sealed, the ground underneath was not clear of debris, the vapor barrier was not sealed to the walls of the foundation, the sheet joints were not sealed with tape and in several places, dirt was exposed.
Picture of the Improperly Installed Vapor Barrier:
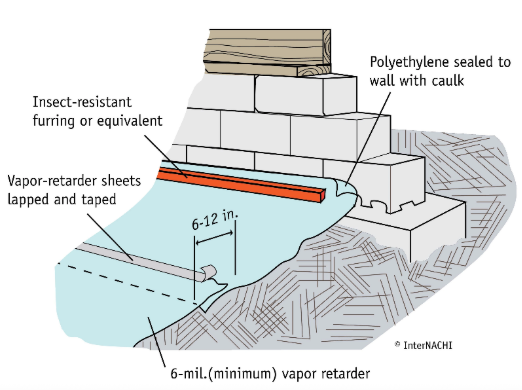
- What does a Properly Installed Vapor Barrier Look like?
- The vapor barrier should:
- Cover the entire crawlspace area
- Extend up interior columns 4-12 inches and be sealed at the top with mesh tape and mastic.
- Sheet joints should overlap by a minimum of 12 inches and be sealed with tape.
- Vapor barriers should extend up the interior surface of the foundation walls up to 4 inches below the top of the wall and sealed at the top with mesh tape and mastic.
The following two diagrams from InterNACHI provide additional details about the proper installation of a vapor barrier:
- The vapor barrier should:
- The Science: Ground soil naturally evaporates gallons of water daily. Without a barrier, this moisture rises unchecked into the crawlspace.
- The Consequence: Improper installation of a vapor barrier will allow moisture to infiltrate the crawlspace and raise the relative humidity. A properly installed vapor barrier can reduce the amount of ventilation required for the crawlspace, reducing it from 1sq. ft. of ventilation for every 150 sq. ft. of floor spaces to a ratio of 1:100.
- What happens if a crawl space lacks a vapor barrier? Without a proper vapor barrier, ground moisture evaporates into the space, which can elevate the humidity levels, leading to wood rot, organic growth or other air quality issues.
IV. Issue #3: Lack of Cross Ventilation
The International Residential Code calls for 1 square foot of ventilation to the exterior for every 150 square feet of crawlspace. This ratio changes depending on the construction of the crawlspace. The presence of a properly installed vapor barrier and insulation reduce or eliminate the need for exterior ventilation. But everything must be installed correctly to meet the reduction requirements. If none of those exist then we should meet the ratio of 1:150 and have adequate cross ventilation, meaning the vents should be installed within 3 feet of the corners of the building and allow for cross ventilation.
- The Problem: In this home, the vents were small (this was an older home in St. Louis), but the vents were placed on the side of the home, which created dead zones in the crawlspace ventilation. Essentially the air was not being properly exchanged at the front and rear of the home.
Picture of the Small Vents:
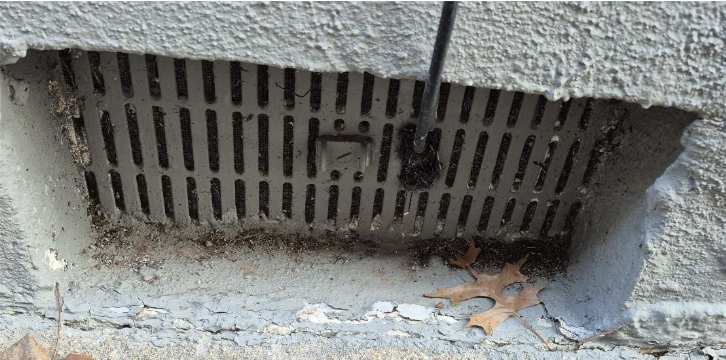
- The Science: Air needs to move to carry moisture away. Stagnant air allows relative humidity (RH) to spike above 70%.
- Note: While cross-ventilation is the traditional code requirement, modern building science in humid climates often prefers “encapsulation” which turns the unconditioned space into a conditioned space. However, on historic older homes, this may not be feasible or cost effective so mechanical ventilation may become your best answer. The key is to ensure that the crawlspace experiences airflow and air exchange.
- The Consequence: Higher humidity levels compounding with the other issues leading to more significant problems.
VI. Issue #4: Exterior Moisture Intrusion
- The Problem: This is the #1 enemy. Water entering from the outside due to negative grade (soil sloping toward the house) or failing gutters/downspouts. Water can damage the foundation, cause settling and introduce additional moisture into the crawlspace.
- The Science: Hydrostatic pressure pushes water through block walls, or gravity pulls it under the footer or through cracks in the foundation. Water will always take the path of least resistance, and once it’s created a channel, it will continuously follow that path.
- The Consequence: Standing water (puddles). This creates a perfect ecosystem for mold and undermines the foundation footing, potentially causing settling/cracking in the home above.
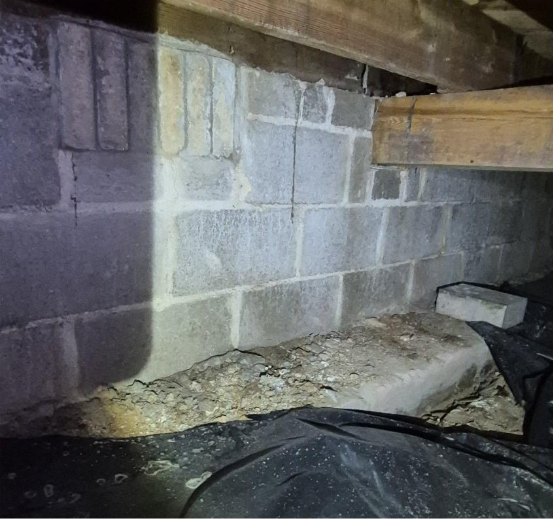
- Inspector’s Insight: During inspections we look for “efflorescence” (white powder) on the brick/block walls or water stains a telltale sign of past water intrusion.
Here’s a picture of past water intrusion at the foundation wall:

VII. The “Larger Problem”: How These 4 Issues Converged
- Synthesis: When all these issues began to compound over time, it created an environment where air quality could degrade and mold could grow.
- The Result:
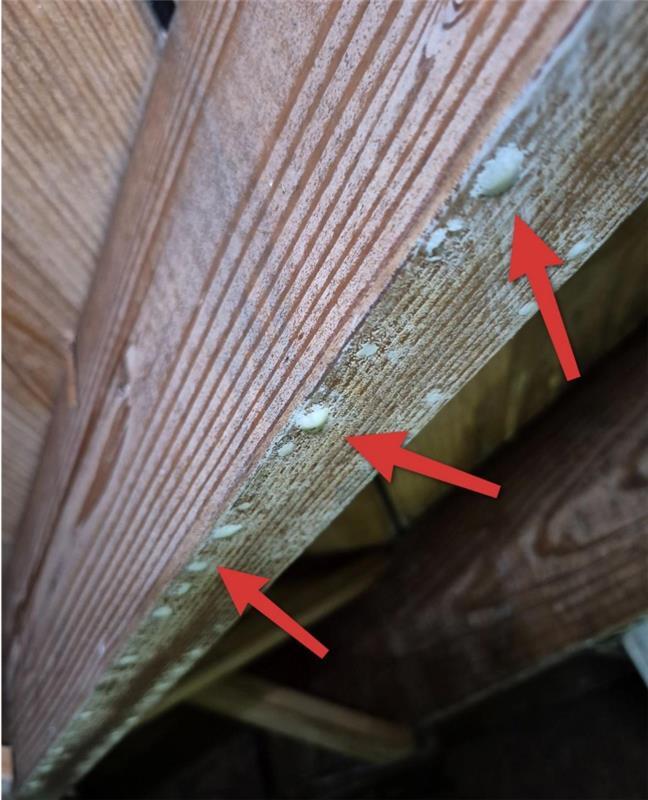
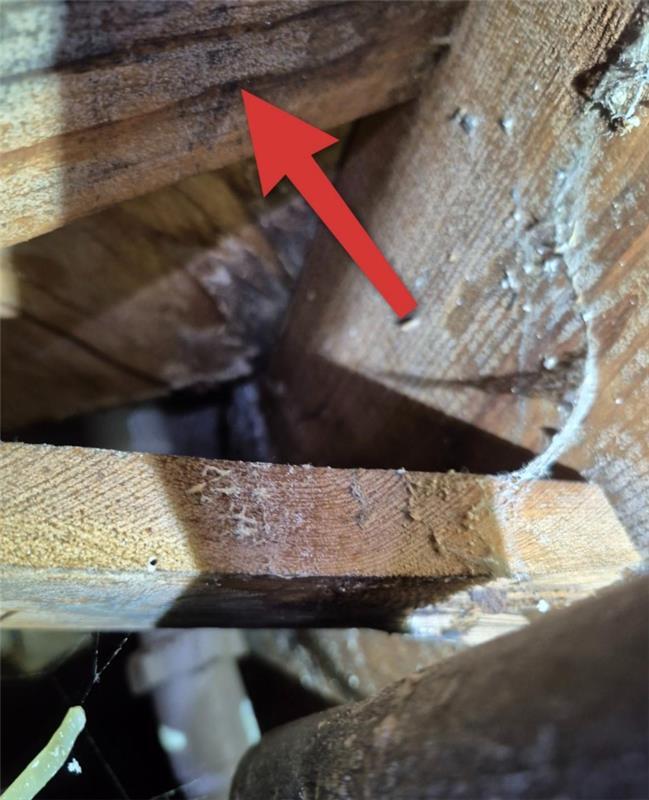
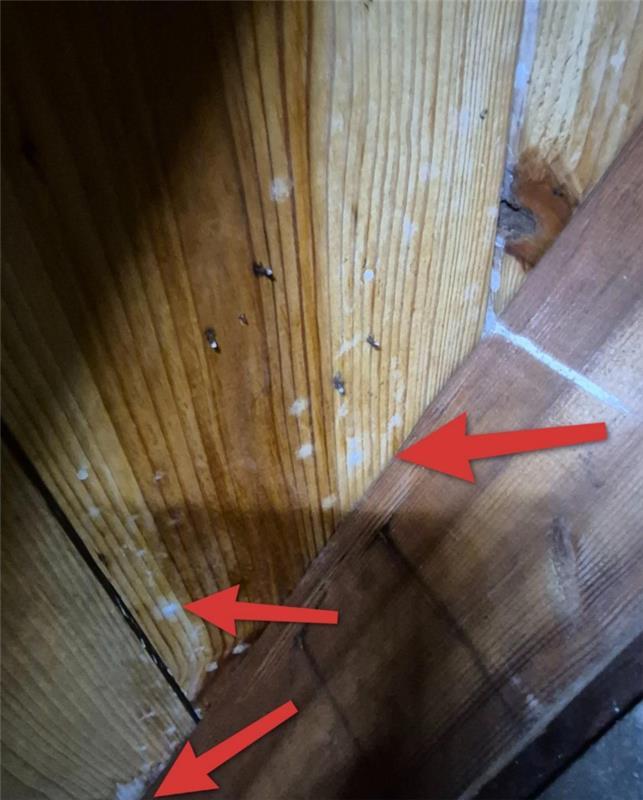
- Microbial Growth: During the inspection, organic growth was discovered throughout the crawlspace. Multiple colors were observed and it was noted that it was widespread and not isolated to a single spot. Mold requires time, moisture and food to grow. The compounding issues in this crawlspace provided plenty of all the required elements which allowed it to thrive. This level of mold will require support from a mold remediator to ensure that it is completely and properly removed. If left unchecked, mold can cause structural damage which would result in greater expense in replacing the damaged building materials.
- Health: With the large openings in the ductwork and the widespread mold growth (the pictures don’t do the colonization of the mold growth justice, it was on the majority of the joists), present in the crawlspace, there was a strong possibility that the mold spores had been spread throughout the home in via the HVAC system. The only way to determine this would be to take mold air samples in each room of the home to determine if any one area had elevated mold levels.
I know you’ve been patiently waiting for it, so here’s pictures of the mold:
VIII. Conclusion
This case study examines how multiple neglected issues in a crawlspace can compound to create serious mold problems that affect the entire home. A St. Louis area inspection revealed four interconnected problems: leaky HVAC ductwork with rusted-through sections that allowed conditioned air to escape while pulling contaminated crawlspace air into the home’s living areas; an improperly installed vapor barrier that failed to prevent ground moisture from evaporating into the space; inadequate cross-ventilation due to poorly placed vents that created stagnant air pockets; and exterior water intrusion from negative grading near the foundation. Together, these issues created an environment with elevated humidity levels that promoted widespread microbial growth throughout the crawlspace, with mold spores potentially circulating through the home’s HVAC system. The case demonstrates why periodic crawlspace monitoring is essential, as addressing these problems early could have prevented the need for extensive mold remediation and potential structural repairs.